Big Sur Bakery's Scones
 When you've decided to move out of the house that you've lived in for six-plus years and are surrounded by boxes and crunchy packing paper and millions of pounds of tiny plastic toys and two kids' worth of baby clothes and ugly maternity clothes and unread magazines (and God only knows what's lurking under that forgotten area under the basement steps), what's the most obvious thing to do? Spend three days trying to make a freaking scone recipe work, of course! HAHAHA OH GOD PLEASE SEND XANAX UNTIL MID-OCTOBER.
Needless to say, I've been tired these past couple weeks. Tired and anxious and overwhelmed, and trying not to lose my mind. What I've learned is that even people who think they don't save anything (like me) can still hoard unused and/or unusable junk in every imaginable corner. (Apparently my approach to maintaining order in my house while starting to write my third book when the baby was just three months old was to just keep shoving everything in the garage to avoid making decisions--brilliant!) I've also learned that once you have more than one kid, quarterly purges are necessary. I've decided this is my new life plan. At least until my kids get their own houses to fill up with their own useless junk. In the meantime, I'm the one that has to do the household purging, and so I used the testing of a scone recipe as the distraction to keep from throwing myself off the overstuffed roof.
Fortunately (or unfortunately?), this scone recipe provided a lot of distraction, in that I could not get the dang thing to work. It's a recipe from The Big Sur Bakery Cookbook, a book I've loved and used several times with success, from a bakery that is one of the most magical places on the planet. I'm still not sure if it was the recipe or user error or what, but even if the amounts were clearly off and the whole lot kept spreading like lava onto the baking sheet, the flavor was so good and the crunchy, craggy, sugary top so addictive that I felt like I had to keep trying until I at least came out with something that didn't resemble a mass of scone-ish cookie. (Though when you're in the freaking-out stage of moving, anything even remotely resembling a cookie, even if you're not trying to make cookies, is kind of exciting. That plus a glass of wine and I can go one more round with the tape gun, no problem.)
But after two failed batches, I wanted more from these scones. I wanted something that didn't run all over the sheet tray and had at least a little bit of loft like a traditional scone. Like I said, it could have been the recipe itself (happens even with the best books) or it could have been user error (the flour amounts are listed only in cups in the book, and no indication of how much a cup of flour should weigh for its recipes; see also the above comments about losing my mind), but with every trial, I couldn't help but feel like there was way too much liquid (in the form of lots more butter, sugar, and buttermilk than any other scone recipe I'd made before) for the amount of flour involved. The dough felt so much stickier than any scone dough I'd ever worked with, and I never really got the "shaggy" look that the recipe talked about, even when working the mixture with a light touch and keeping everything cold, cold, cold.

Eventually, I decided to use my baker's instinct and add in a little more flour until it just felt right, and I ended up with something much more scone-like in the end, while still maintaining a buttery quality and an almost cake-like sweetness that I haven't experienced in many scones. I'd say the bottom line with this recipe is to go by feel, which is kind of painfully non-specific, but when you consider that this recipe comes together a lot like pie crust (which is notorious for needing a little tweak here and there depending on the specific flour you're using, weather, warmth of your hands on a particular day, etc.), it's not such a crazy idea after all to be a little more flexible with amounts until it just feels right.
The short story is that these aren't like any scone you've ever tried, and that's not necessarily a bad thing. I'm looking forward to making these in another couple months, when I'm no longer living in cardboard box chaos, and can know going in that I'll just have to get over my type-A baking tendencies for this recipe, and be willing to feel out the conditions of the dough as I go. I'm sure there's an Oprah-esque Life Metaphor in there somewhere, don't you think?
Big Sur Bakery Scones Adapted from The Big Sur Bakery Cookbook
Makes 24 3 1/2-inch scones
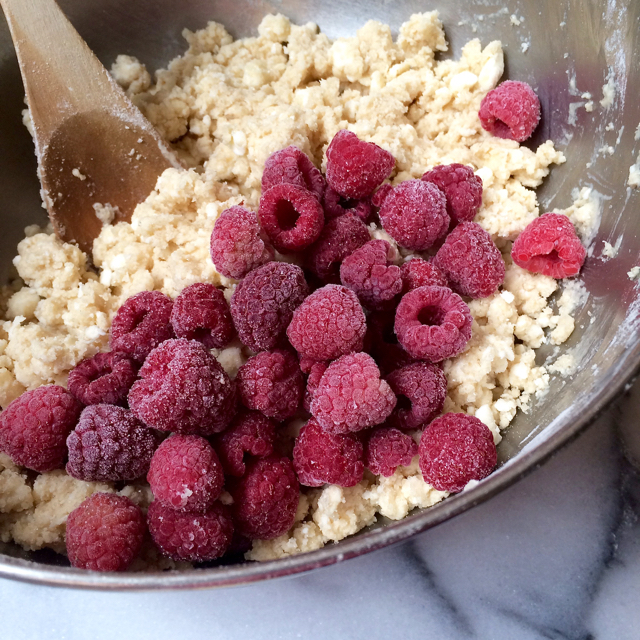
This is a most excellent building block recipe--just swap out the frozen berries (either fresh and in season that you freeze yourself, or the bagged variety) for other types of frozen fruit. The key to this recipe is to not be afraid to add a touch more flour as needed to make the dough shaggier and not sticky (I used an extra 1/3 cup or so), and to follow the directions of keeping everything freezing cold, from the fruit to the dry ingredients. The original recipe calls for a 3-inch mold to shape the scones, which would make enormous, bakery-sized specimens. I used a 1/4 cup standard ice cream scoop to shape the scones instead, lightly packing the mixture into the scoop before depositing onto the baking sheet, and they're still plenty big.
You can halve the amounts here to make just 12 scones, which is probably more realistic for most of us, but if you opt to make a full batch of dough, this recipe is also be an excellent candidate for freezing: just shape the dough into pucks, freeze on the sheet until firm, and store in a ziptop bag. Add a couple extra minutes onto the baking time, and you're all set to bake them from frozen.
1 cup (6 ounces/170 grams) fresh berries or other fresh ripe fruit (or 1 cup bagged frozen berries) 3 1/2 to 4 cups (15 3/4 to 18 ounces/448 to 512 grams) all-purpose flour 1 cup (7 ounces/200 grams) granulated sugar 1 tablespoon baking powder 2 teaspoons baking soda 3/4 teaspoon fine sea salt 1 cup (2 sticks/8 ounces/224 grams) cold unsalted butter, cubed 2 tablespoons pure vanilla extract 3/4 cup (6 ounces/170 grams) well-shaken cultured buttermilk 1/4 cup (1 3/4 ounces/50 grams) turbinado sugar, for sprinkling
To begin, if you're using fresh berries or other fruit, scatter onto a cookie sheet and freeze until firm, about 1 1/2 hours.
In a large bowl, whisk together 3 1/2 cups of flour, sugar, baking powder, baking soda, and salt, and drop in the cold, cubed butter. Freeze the for 30 minutes. Position an oven rack to the center of the oven and preheat it to 375°F. Line a baking sheet with parchment paper.
Using a pastry cutter or two knives (or hands, if you're the cold hands/warm heart type), work the butter into the dry ingredients just until the butter cubes are the size of peas. Make a well in the center. In a small bowl, whisk together the vanilla and buttermilk, and add it to the dry ingredients. Mix the ingredients with a wooden spoon to form a shaggy mass. If the dough appears wet, like a cookie dough, add about 1/4 cup more flour. Let stand for 3 to 5 minutes to let the flour absorb the liquid, then fold one more time. Repeat the process one more time with an extra couple tablespoons of flour if needed to get a shaggy look to the dough.
Add the frozen fruit and gently toss to mix, to avoid crushing the fruit an staining the dough.
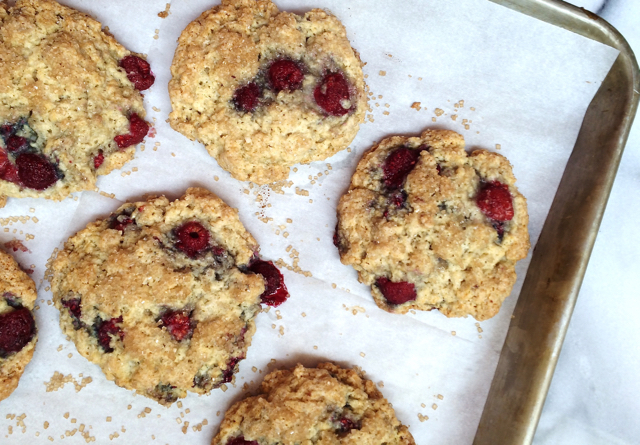
To shape the scones, lightly pack portions of dough into a 1/4 cup standard cream scoop and deposit mounds onto the prepared baking sheet, leaving enough room for the scones to double in size. pat the tops of the scones down lightly to make sure the scone is compact. Sprinkle the tops of the scones with turbinado sugar. Bake for 15 minutes or until they are golden brown and crunchy, but still a bit tender towards their centers.
Carefully transfer the scones to a cooling rack and let them cool for at least 10 minutes before serving. Store in an airtight container at room temperature for up to 3 days.